If you buy something through a link in our posts, we may get a small share of the sale.
The hassle of making a homemade beer can be frustrating if you don’t have the right equipment. With the best electric homebrew system, you can be able to make an exception of beer in a variety of styles and flavors without the inconveniences of mass brewing equipment.
Contents
- My Top Electric Homebrew System
- Best Electric Brewing System: Grainfather Connect Complete All-In-One System
- Best Electric Homebrew System for the Money: Robobrew V3
- Best Cheap Electric Brewing System: Northern Brewer Gigawort
- Best All-In-One Electric Homebrew System: Klarstein Mainschfest
- Best Durable Electric Homebrew System: Brewer’s Edge
- Features to Consider in an Electric Homebrew System
- How to Make Beer at Home With an Electric Brewing System
- Step 1: Choose an Ideal Electric Brewing System
- Step 2: Sanitize the Electric Brewing System
- Step 3: Milling the Grain
- Step 4: Fill the Hot Liquor Tank With Water
- Step 5: Heat the Water in HLT
- Step 6: Transfer the Hot Water to Mash / Lauter Tun
- Step 7: Mash
- Step 8: Mashout
- Step 9: Sparge
- Step 10: Boil
- Step 11: Chill
- Step 12: Ferment and Package
- Frequently Asked Questions
- Conclusion
My Top Electric Homebrew System
If you want an electric home brewing system that combines everything from mashing to fermentation, then consider going for an electric homebrew system. In this review, I will help you identify the best electric homebrew system in 2021.

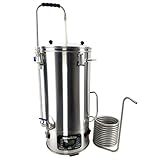
Best Electric Brewing System: Grainfather Connect Complete All-In-One System

If you love the convenience of a remote-controlled home brewing system, you can’t go wrong choosing the Grainfather Connect Complete All-In-One Beer Brewing System.
This brewing system allows you to control the brewing from whichever place and receive an alert when it’s ready for the next brewing step, thanks to the Bluetooth and mobile app connectivity.
Alternatively, you can use a remote to regulate the pump and the temperature of your brew from an easy control panel on the unit. Unlike the others on my list, it comes with a pump that drives the brew through a counter-flow chiller reducing the chances of contamination.
Also, the pump pumps the cleaning detergent throughout the pipework making cleaning of the system easy and faster. When it comes to building quality, this system features a stainless steel grain basket which ensures durability.
However, it is the heaviest on my list which might inconvenience you when moving it around. To enhance accuracy when regulating the temperatures and to reduce the risk of scorching, this system allows the application of gentle heat at various stages of mashing.
It also allows an increase in temperature where vigorous heating is needed. Although it provides brewing efficiency, keeping the seals in place when inserting the mesh screen in the grain basket is challenging.
Pros
- The Bluetooth connectivity allows you to control the system from your smartphone.
- The counterflow chiller reduces the chances of beer contamination.
Cons
- It is the heaviest on my list, making it unsuitable for moving around.
- Attempting to keep the seals in the right position when inserting the mesh screen in the grain basket is challenging.
- SIMPLE AND USER FRIENDLY: The Grainfather is electrically powered and designed to be used indoors;...
- HIGHEST QUALITY CONSTRUCTION: The Grainfather is made from high quality 304 grade stainless steel...
- INTUITIVE DESIGN: Programmable step mashing; delayed heating; waterproof digital display in Celsius...
Best Electric Homebrew System for the Money: Robobrew V3

The Robobrew V3 is an excellent option for those looking for a large-capacity homebrew system that is easy and simple to handle. It features a capacity of 9.25 gallons, allowing you to prepare a large volume of beer at a go.
It comes with a magnetic drive pump, allowing you to easily recirculate the wort during the mashing process. With dual heating elements, this homebrew system allows easy temperature setting for boiling and mashing.
One element has an output power of 500 watts enabling maintenance of a stable temperature. The other one has 1000 Watts assisting in increasing the temperature to achieve a faster and uninterrupted boiling process.
It also features an inbuilt spigot, ensuring easy decantation of the wort to the fermentation tank. It heats up slowly so you may be required to buy a neoprene jacket to help in insulation.
However, with a weight of 34 pounds, it is the second heaviest on my list, making it unsuitable for moving around.
It is facilitated with a waterproof control panel, relieving you from the fear of work stoppage in case of any spillage. Like the Brewer’s Edge Electric Kettle, it comes with a magnetic recirculation pump ensuring even temperatures throughout the mashing process.
Pros
- The magnetic drive pump allows recirculation of wort during the mashing process.
- The spigot ensures easy wort decantation to the fermentation tank.
Cons
- For better results, the recirculation arm requires extra silicone tubing.
- For efficient insulation, you may be required to buy a neoprene jacket for the system to heat up slowly.
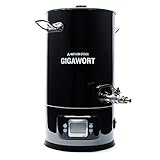
Best Cheap Electric Brewing System: Northern Brewer Gigawort
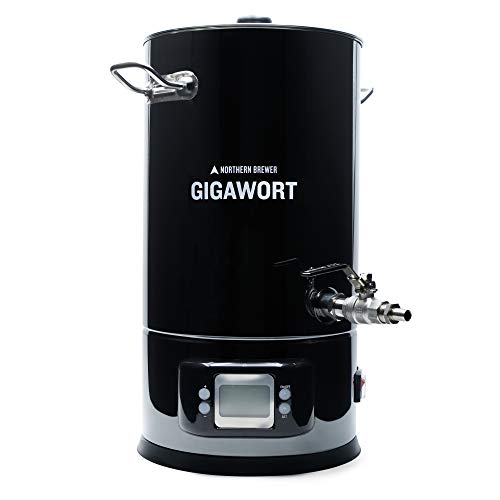
The Northern Brewer Gigawort Electric Kettle is the best home brewing option if your space is limited. Its compact nature also makes it the most lightweight on my list, making it convenient to move around when necessary.
It features a 304 stainless steel construction, ensuring ease of cleaning and durability. With double-walled construction, it provides efficient insulation, making it the most economical in terms of power consumption.
Although it has a low customer rating, it’s an excellent home brewing system with a digital temperature controller that allows temperature adjustment in one-degree increment enhancing accuracy.
Like the Brewer’s Edge Electric Kettle, it allows presetting of the start time for up to 24 hours and automatic switch-off after 3.5 hours, preventing the unit from overheating. The Northern Brewer Gigawort comes with an ISO-flow bulkhead and dip tube, relieving you from the hassle of lifting and pouring the wort into the fermentation tank.
Unlike the Brewer’s Edge Electric Kettle, maintaining a uniform brewing temperature will require you to draw off the wort and add it back at the top. It comes with a capacity of 4.4 gallons, making it ideal for brewers who want to prepare small volumes of beer. However, the ISO-flow bulkhead is poorly designed causing leakage when brewing.
Pros
- It is the most lightweight on my list, making it suitable for carrying around.
- It offers effective heat insulation, making it power efficient.
Cons
- It has a poorly designed ISO-flow bulkhead.
- Unlike the Brewer’s Edge Electric Kettle, it does not include a recirculation pump for even temperatures maintenance.
- Dual element, 1600W for heating to boiling, 600W for maintaining boil
- Double walled construction for better heat retention
- Delayed Start feature, 3.5 hour shut-off to prevent total evaporation and safety.
Best All-In-One Electric Homebrew System: Klarstein Mainschfest
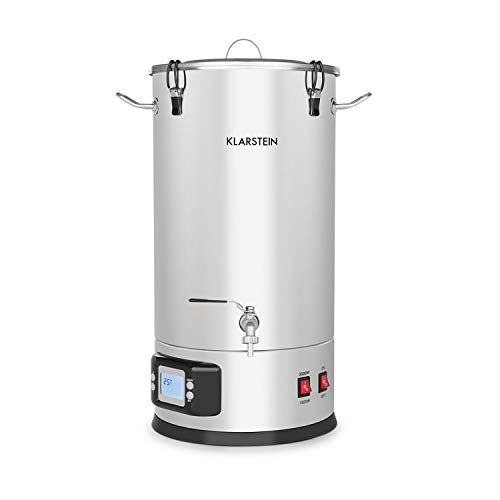
If you are a beginner looking for a versatile electric homebrew system, you can’t go wrong choosing the Klarstein Mainschfest Beer Electric Brewing Kettle. It comes with 5 pieces of a complete brewing set allowing you to prepare any style of beer at home.
Like the Brewer’s Edge Electric Kettle, it features a 304 stainless steel double-walled construction, relieving you from any fear of unwanted chemicals or flavors in your beer.
With an easy-to-operate LED control panel, this electric homebrew system allows you to set your power, brewing time, and temperature manually.
Like the Brewer’s Edge Electric Kettle, the LED display allows you to monitor the temperature of your beer throughout your brewing. Additionally, it comes with a drip ring and a filter insert allowing you to drain and store your beer easily without messing.
When it comes to cooling, the finished mash is cooled within a short period, thanks to the large 7-pass cooling spiral which ensures convenient cooling. The Klarstein Mainschfest kettle comes with a large capacity of 35 liters allowing you to prepare a large volume of beer at a go.
However, if not careful, there are chances of scalding yourself because the lock function on the tap functions whether the tap is on or off.
Pros
- Its construction eliminates the fear of unwanted flavors or chemicals in your beer.
- It has an easy to operate LED control panel.
Cons
- It requires care when operating to avoid burns.
- It is 18.8 pounds heavier than the Northern Brewer Gigawort, making it unsuitable for carrying around.

- VERSATILE: Whether you prefer light or dark, top or bottom fermented, wheat or pilsner, with the...
- COMFORTABLE: Whether you are a beginner or an experienced hobby brewer, the mash kettle provides a...
- INTUITIVE OPERATION: A clearly arranged touch panel with LCD display makes it possible to set the...
Best Durable Electric Homebrew System: Brewer’s Edge
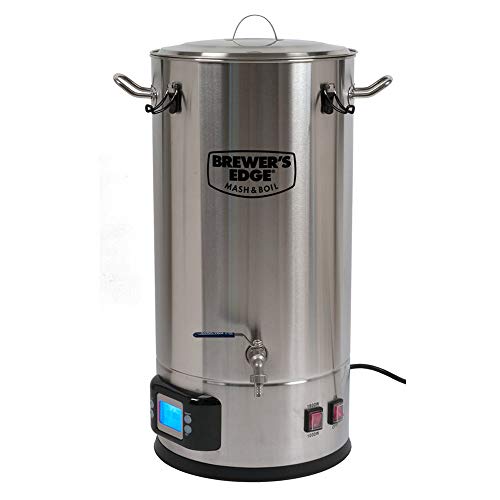
If you are in search of a smart and durable electric home brewing system, the Brewer's Edge Electric Home Brewing System is your best option. With double-wall stainless steel construction, this kettle conserves heat and ensures durability.
It comes with an internal sparging basket, recirculation pump, and thermostat allowing you to boil and mash your beer in the same vessel. Although it ensures convenient mashing, the brew basket has large holes which may need a grain bag.
The recirculation pump ensures that the temperature is uniform all through the mashing process.
Like the Klarstein Mainschfest Beer Electric Brewing Kettle, it comes with a LED screen that displays temperature in either Celsius or Fahrenheit allowing you to monitor the temperature of your beer when mashing.
However, the thermostat has one or two variations making it unsuitable for precision brewers. When it comes to power connectivity, it uses a standard 110-volt household power connector.
Unlike the Klarstein Mainschfest Beer Electric Brewing Kettle, this home brewing system comes with a maximum capacity of 7.5 gallons allowing you to store only 16 pounds of malt.
It is the second most lightweight on my list making it suitable for moving around. With a delayed timer, this home brewing system allows you to pre-program your system and delay the start for up to 24 hours.
Pros
- Its construction quality makes it durability.
- The recirculation pump ensures uniform temperatures throughout the mashing process.
Cons
- The thermostat is not accurate, making it unsuitable for precision brewers.
- You may be required to purchase a grain bag for the brew basket has large holes.

- Mash up to 16lb of Malt
- Maximum Capacity of 7.5 Gallons
- Double Wall, Stainless Steel Construction
Features to Consider in an Electric Homebrew System
Electric homebrew systems from different manufacturers vary in versatility, capacity, ease of use, and build quality, making it challenging to choose the best one. Here are some of the essential features that you should consider when choosing an electric homebrew system.
Additionally, the table below breaks down some of these features for easier digestion.
| Product | Material | Capacity (Gallons) | Weight (Pounds) | Dimensions (Inches) |
| Klarstein Mainschfest Beer Electric Brewing Kettle. | 304 Stainless Steel | 9.2 | 27.8 | 35.8 x 16.8 x 16.7 |
| Brewer’s Edge Electric Home Brewing System | Double Wall, Stainless Steel | 7.5 | 20.6 | 14 x 14 x 28 |
| Northern Brewer Gigawort Electric Kettle | Double Walled, 304 Grade Stainless Steel | 4.4 | 9 | 13.25 x 13.25 x 23.25 |
| Robobrew V3 | Stainless Steel | 9.25 | 34 | 19 x 19 x 32 |
| Grainfather Connect Complete All-In-One Beer Brewing System | 304 Grade Stainless Steel | 8 | 37 | 20 x 30 x 18 |
Capacity
The first thing you will need to consider when choosing an electric homebrew system is the capacity of the equipment. You will need to choose a kettle that has a larger volume than the amount of beer you are planning to make.
For instance, if you’re not planning to prepare 7 gallons of beer, you can go for a kettle with a capacity of around 9 gallons like the Robobrew V3. Keep in mind that the batch can go stale if not used for some time, and so there is no point in buying a way too large a kettle than you need.
You will also need to remember that a large-capacity kettle will take up much more space than a small-capacity kettle. It is therefore advisable to consider your available space before going for a large-capacity electric homebrew system.
Build Quality
The build quality of an electric homebrew system is something you cannot overlook. Typically you will want a homebrew system that will serve you for years without breaking.
High-quality electric homebrew systems such as the Brewer’s Edge Electric Home Brewing System come with stainless steel double walls.
The stainless steel double walls provide effective heat insulation which minimizes power consumption. That means even if a kettle with stainless steel double-wall might be on the higher end of the price spectrum, you’ll have a long-term benefit of reduced electricity bills.
Besides, the stainless steel double-walling like the one in Klarstein Mainschfest Beer Electric Brewing Kettle helps to keep your beer free from unwanted chemicals or bacteria that might cause off-flavors or bad smells.
Extra Features
The designs of the electric home brewing systems are evolving, and the latest versions of these kettles come with advanced features that do all the brewing process for you.
However, not all models and brands come with these extra features and so you have to check them out when purchasing one.
For instance, the Grainfather Connect Complete All-In-One Beer Brewing System features advanced technology that allows you to control your brewing process remotely using a Bluetooth-enabled device or a mobile application.
On the other hand, an electric home brewing system such as the Robobrew V3 comes with an advanced magnetic pump that helps to recirculate the wort during the mashing process.
Depending on your brewing style and needs, choose an electric brewing system that comes with extra features that will make your brewing efficient and easy.
Power Connectivity and Consumption
As the name suggests, an electric home brewing system uses electricity in its operation. Although the power consumption of an electric home brewing system mainly depends on the capacity of the kettle, different brands and models have varying power efficiency.
For instance, the heat insulation offered by the Northern Brewer Gigawort Electric Kettle significantly reduces power usage. Although the initial cost of purchasing such a kettle might be high, in the long run, it will save you more money in power bills.
You will also need to consider the power outlet in your home and then choose an electric home brewing system that matches the voltage requirements. For instance, if your home has a 110V power outlet, you can connect the Brewer’s Edge Electric Home Brewing System without issues.
Temperature Control
One of the cool features that you don’t want to lack in any electric home brewing system is advanced temperature control. Some electric home brewing systems such as Brewer’s Edge Electric Home Brewing System come with a delayed start function temperature control.
This delayed start function allows you to pre-program your brewing process and then delay the startup for up to 24 hours. This way you can fill the system with the required amount of water set the timer and then go to bed.
The timer makes the system heat to the right temperature by the time you wake up. The advanced temperature control also keeps the mash temperature at the optimum level. This automatic temperature control is precise and you can even control it remotely using a smartphone app.
All-In-One
One reason that might be making you buy an electric home brewing system is its ability to brew without using other equipment. However this capability varies with models and brands, and some are more advanced than others.
For example, the Robobrew V3 comes with a magnetic drive pump, sparging basket, and dual heating elements, allowing you to boil and mash your beer in the same vessel. Also, the thermostat enhances precise temperature control during the entire brewing process.
Some all-in-one electrical homebrew systems come with advanced features that can even alert you through the phone when a process is complete. This gives you the flexibility to engage in other duties as you wait for an alert that the brewing process needs to go to the next step.
Pump vs No Pump
If you aim to use an all-grain brewing approach then consider going for an electric home brewing system that features a pump. Electrical home brewing systems such as the Grainfather Connect Complete All-In-One Beer Brewing System uses a pump to ensure constant heat circulation, maintaining a uniform temperature in the entire grain bed.
Also, this pump can pump the cleaning detergents through the system piping, making it easier to clean the system. If the electric homebrew system doesn’t have a pump, it means you will have to manually draw off the wort and then pour it back at the top.
Type of Beer
The type of beer you are making will determine the kind of grain home brewing system you will use. There are specific types of electric brewing systems designed for each type of beer and others that can handle both.
If you are unsure which one to use when brewing beer, go for all grain brewing system suh as Grainfather Connect Complete All-In-One Beer Brewing System, which will make your work easire.
Power Mode
Power mode plays a vital role when choosing a home beer brewing system. Many of these brewing systems offer different power modes, making it easy to customize your brew how you would like.
Power modes are classified into two: Manual and electric. The frequency you use your electric brewing system to brew your own beer will determine the power mode you need. If you frequently brew, you will need automatic power. However, you will need a manual power mode if you brew after a long time. If you are a newbie, consider using Klarstein Mainschfest Beer Electric Brewing Kettle because it contains all you need.
How to Make Beer at Home With an Electric Brewing System
Brewing your own beer using an electric brewing system is easier. If you are a beer enthusiast and want to try your hand at brewing, you can start immediately using one of the best electric brewing systems reviewed. For instance, you can use Grainfather Connect Complete All-In-One Beer Brewing System to craft beer.
However, before coming up with a well-crafted beer, you must follow certain steps to ensure that the final product is tasty and meets brewing standards. The following is a step-by-step procedure that will help you craft beer using an electric brewing system:
Step 1: Choose an Ideal Electric Brewing System
The first step to crafting your own beer is choosing the best electric brewing system to help you out in the process. The market has various electric brewing systems, each with features, advantages, and advantages. Therefore, ensure that the equipment you choose is standard and will not have any hitch in the brewing process.
The following are some of the characteristics of ideal all grain brewing system:
- It has a larger volume to accommodate the batch without any problem. For instance, if you plan to prepare a 5-gallon beer, you need to get a 7-gallon brewing system to allow room for any unforeseen occurrence.
- It has a digital control panel. This panel is an essential feature that helps you know what is happening in your brewing kettle. This is where you set the temperature, set the timer, and monitor the brewing process. Some of the best electric brewing systems have advanced features, such as Bluetooth connectivity, to alert you when something is wrong or the brewing process is complete.
- It has a circulation pump. The circulation pump ensures an even heat distribution, maintaining a uniform temperature in the entire grain bed. The pump also makes it easy to clean the equipment because it will circulate the detergent in all corners to loosen the debris before rinsing.
- It is an all-in-one brewing system. This means you can brew without using other equipment to supplement the process. Such equipment has a magnetic drive pump, sparging basket, and dual heating elements, allowing you to boil and mash your beer in the same vessel. Some also come with an in-built thermometer to help you read the temperature instantly.
Step 2: Sanitize the Electric Brewing System
The second step is ensuring your electric brewing system is clean and sanitized. This will remove any bacteria and microorganisms that could ruin or give your beer a bad taste. There are two ways of cleaning this equipment, Mechanical and chemical.
Mechanical cleaning includes using an abrasive to scrub any remaining bacteria or microorganisms. Chemical cleaning can be done with a diluted solution of bleach or iodophor, which will kill all bacteria that could ruin your batch.
After cleaning the whole system, ensure the equipment has dried up. This will prevent rusting of the heating element or any other component of your all grain brewing system. You can allow the equipment to air dry or use fan to speed up the drying process.
Step 3: Milling the Grain
The next step is milling the grain to break them into smaller pieces so they can be extracted easily during brewing. You can use a hand-crank grain mill to grind the grains or an electric mill to carry out the process. An electric mill is better as it helps avoid issues such as stuck sparges, which can be problematic with some beer styles.
If you are using an electric mill, ensure it has a removable hopper to easily add grain without spilling any on the table or floor. Also, avoid fine crushing, which could lower the mash efficiency and impede fluid flow. You also want to mill at a lower speed (140-250 RPM) to avoid grain husks, reducing the possibility of extracting excess tannins.
Step 4: Fill the Hot Liquor Tank With Water
A hot liquor tank, or HLT, is a vessel that holds water at a constant temperature. When filling the HLT, it is advisable to fill it with water twice as much as the beer you want to brew. For instance, if you are going to brew 5 gallons of beer, you need to add 10 gallons of water.
Before adding water using the inlet hose pipe, ensure all the ball valves are closed in the entire all grain brewing system. This will ensure there is no water spillage. When everything is set, open the inlet valve, turn on the water source, and fill the HLT to the required capacity.
Some brewers will want to add a small amount of potassium metabisulfite (250mg per 10 gallons) to remove the chlorine. Remember that the presence of chlorine or chloramine in the water might give your beer a band-aid or plastic taste. Therefore, you need to treat the water before it is too late.
Step 5: Heat the Water in HLT
The next step is heating water in the HLT to an ideal temperature ( 149 Fahrenheit). The heated water is known as “strike water” and releases the sugars from the grains after soaking. At this point, ensure you connect control box and turn it on.
After turning on the digital control panel and you have confirmed that the whole system is working, open the water pump valve, followed by the HLT IN valve, and finally, the HLT OUT valve. It is essential to follow that order to ensure the pump head is primed. Also, turn on the water pump to recirculate water through the Hot Liquor tank continuously.
The next step is turning on the element and setting the HLT temperature to 149 Fahrenheit mash temperature. If you are busy doing other things, it is recommended that you set the HLT alarm to sound when the temperature reaches 149 Fahrenheit.
The alarm is found on the digital control panel and is simple to set. Press and hold the SET button on the HLT PID, and the alarm will be displayed, then select the required temperature (149 Fahrenheit).
Heating the water will take approximately 40-60 minutes to reach the mash temperature depending on your heating element. Experienced homebrewers use a heating element of 5500W as they consider it ideal.
Step 6: Transfer the Hot Water to Mash / Lauter Tun
It is now time to transfer the strike water to the mash tun. This is where the mashing of grain will take place. Note that the amount of water you transfer will play a vital role in the beer you produce. Therefore, you need to get the correct ratio to have a thicker mash which will produce a sweeter beer.
The process is simple: open the lauter tun IN valve, the pump valve, and the HLT OUT valve. Follow this order to ensure the pump head is fully primed. Next, turn on the water pump and transfer the required amount of strike water to the lauter tun. Always keep the Lauter and HLT lids on to minimize heat loss.
Step 7: Mash
The next step is to mash, which is the process of soaking the grains in hot water. This converts their starches into fermentable sugars, which are then converted into alcohol during fermentation. The resulting liquid is called wort.
Before begining the mashing process, you want to maintain the mash temperature. Some of the heat may have been lost during the transfer of strike, so you need to recirculate through the HERMS coil for about 15 minutes.
The first thing to do is to open all the Mash tun valves, HLT valves, and pump valves. Next, turn the wort and water pump ON and turn the Element Select switch to HLT. This will allow the water in the Lauter tun to recirculate in the HERMS coil and maintain the mash temperature (149 Fahrenheit)
After attaining the mash temperature, it is time to add the grain. The amount of grain you add will depend on the beer you want to brew. Scoop a milled grain using a small bowl and add it into the lauter tun. Stir for a few minutes to make the grain wet and reduce the formation of dough balls. Ensure you stir gently to minimize the introduction of oxygen. Remember that oxygen may lead to off-flavors.
After mixing thoroughly, take the PH reading of the mash. Do this by directly inserting the PH meter into the mash and recording the readings. An ideal mash PH should range from 4.5 to 5.6. The mashing process should last for 90 minutes. This time is enough to convert starch into sugar from the grain.
Step 8: Mashout
Mashout is the process of raising the temperature of the mash to 168 Fahrenheit before sparging. The purpose of mashout is to preserve the fermentation sugar profile.
On your all grain brewing system, press the up button on HLT and select 168 Fahrenheit. The HLT will raise the temperature to 168F while allowing the mash to flow. This will take 15-20 minutes. For more accuracy, you can set the alarm sound to alert you when the process is complete.
Step 9: Sparge
Sparging is rinsing the mash grain to extract as much sugar as possible without extracting the tannins. The resultant liquid is known as “sweet wort.” Start by filling the HLT with water and then sparge until a pre-boil volume is reached. Pass the saparge water through the HERMS coil and then deposit on top of the grain in Lauter tun.
Open the Lauter tun and HLT tun valves. Next, open the water and wort pumps and allow the wort to trickle into the boil kettle. Keep at least 2 inches of water on top of the grain bed until the Hot Liquor Tank is empty. Turn off the water pump immediately after the HLT is empty.
Continue collecting the wort in the boil kettle until you get the required amount. The process should take 60-90 minutes, regardless of the batch size.
Step 10: Boil
The first thing to do in this step is to get the PH reading. You want to make sure you have the ideal PH of the wort (4.6-5.5). If the PH is high, add some 88% lactic acid to get it to the required PH level. An ideal PH helps produce a good protein break during the boil. It also minimizes color formation, especially if you want to brew a lighter beer.
On the kettle PID, press the UP/DOWN button until it reads “M 100” on the lower end. This is firing the kettle to 100% to boil the wort. It takes 30-45 minutes. You can keep the lid off during this process to monitor the process.
Step 11: Chill
After boiling, the next step is chilling the wort as quickly as possible. This prevents oxidation and also prevents contamination from bacteria and wild yeast. You can use cold tap water to carry out the process. The target is to reach a temperature of 68 Fahrenheit.
Step 12: Ferment and Package
Once the wort has chilled, it is fermented into beer. Place the wort into a fermenter and let it sit for two weeks. The temperature control unit will automatically adjust so that your beer ferments at the desired temperature – no need for stirring or checking on it every few hours.
Once fermentation is complete, transfer the finished beer into bottles using a bottling wand or kegging equipment, if available, and package your beer. That is it!
Frequently Asked Questions
Why Should I Use Electricity Instead of Gas When Brewing?
The use of electricity ensures easy and precise control of temperatures. Unlike gas which may emit toxic gases, there are no emissions with electricity, making it suitable for indoor brewing. Gas installation is also costly as it requires 10 times more ventilation than electricity.
What Is an All-In-One Electric Home Brewing System?
The all-in-one brewing system is an advanced brewing system that handles the entire brewing process in one machine.
The traditional setups needed several pieces such as a cooler and a kettle, making it inconvenient for people with limited space. The three-vessel traditional system specifically is bulky and unattractive to look at.
How Long Does It Take to Brew Using an Electric Homebrew System?
Like any other homebrew setup, an electric homebrew system will take around 5 to 8 hours to make the sugary-sweet hop liquid malt, commonly known as the wort.
Conclusion
Although all the electric homebrew systems will help you get rid of the bulky and large traditional home brewing equipment, they still vary in versatility and ease of use. Luckily, the above list provides you with the best electric homebrew system in 2021.
